Crane Remote Control Installation: 7-Step Technical Guide for Correct Setup
Incorrect crane remote control installation is one of the most common causes of early system failure in industrial crane operations. Frequency mismatch, insufficient grounding, incorrect IP rating selection, and skipped safety tests are each capable of producing either immediate system failure or slow-developing faults that become apparent only after months of operation. This guide covers the complete installation process in seven sequential steps — from system selection to final load commissioning — with the technical criteria and standards references required at each stage. Skipping any step in this sequence does not save time; it creates faults that are significantly more expensive to diagnose and repair after installation than to prevent during it.
Get in Touch for All Your Requirements
Step 1: Select the Correct System Before Installation Begins
The most consequential decision in the entire installation process is system type selection. However, a correctly selected system that is incorrectly installed will fail as reliably as an incorrectly selected one. Both decisions must be correct for the installation to succeed. Three parameters directly determine the correct system type: operating range, environmental conditions, and crane capacity.
Wireless vs Wired: Application-Based Decision
- Wireless systems: Provide 50–300 m effective operating range and allow the operator to work from outside the load hazard zone. Consequently, they are the correct specification for large-span cranes, outdoor sites, and any application where operator repositioning during the lift improves safety or positioning accuracy.
- Wired pendant systems: Offer the highest signal reliability with zero interference risk. However, they constrain the operator to the cable length. Therefore, they are appropriate for small workshop applications, fixed-position lift stations, and installations near high-power EMI sources where wireless reliability cannot be guaranteed.
IP Protection Rating Selection
The IP rating must match the actual operating environment — not a general category. Specifically: IP54 for dry, enclosed workshops with no dust or moisture exposure; IP65 for outdoor installations, dusty production environments, or any site with spray or splash exposure; IP67 for wash-down areas, ports, and environments with direct water immersion risk. For a detailed comparison, see our wired vs wireless crane remote control guide.
Step 2: Verify System Compatibility with the Crane Before Installation
Incompatibility between the crane remote control and the crane’s electrical system can render the installation non-functional immediately — or, in worse cases, can cause receiver PCB damage that is only apparent after the system has been powered. All three compatibility parameters below must be verified from the crane’s electrical schematic before any component is mounted.
Supply Voltage and Current Compatibility
The receiver unit’s supply voltage rating must match the crane’s electrical supply. In industrial three-phase systems, the common supply configuration is 380V / 3-phase. However, some crane control circuits use a step-down transformer to provide 24V DC or 110V AC for the control circuit — the receiver must be specified to match whichever supply it will be connected to, not the main three-phase supply. Connecting a 24V receiver to a 380V supply destroys the receiver PCB immediately and permanently.
Contactor Drive Capacity
The receiver’s output relay contacts must have sufficient current rating to directly drive the crane’s motor contactors. Contactor coil currents are typically in the 0.5–2A range, but this must be confirmed from the contactor datasheet. Specifically, a receiver output rated for a lower current than the contactor coil requires will overheat and fail within weeks — not immediately, which makes this failure pattern difficult to attribute to the original specification error.
Frequency and Channel Compatibility
The transmitter and receiver must operate on the same frequency band and be correctly paired before any other system on the same site is powered. Powering a transmitter on a site with other active wireless crane systems — before completing the pairing procedure — risks activating the wrong crane or creating a channel collision that affects multiple systems simultaneously. Therefore, pairing must be completed as the first powered step after physical installation, with all other crane systems in a known safe state.
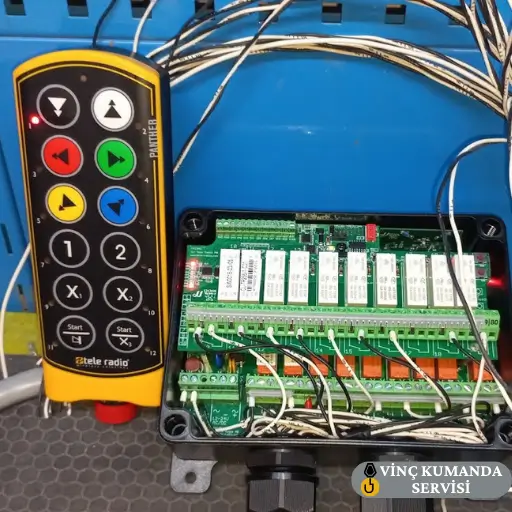
Step 3: Select the Correct Receiver Mounting Location
The receiver unit’s mounting position directly affects signal quality, long-term reliability, and the speed of any future maintenance intervention. However, a position that appears convenient during installation may prove problematic in service — antenna clearance, environmental exposure, and access for maintenance must all be evaluated before the mounting point is finalised.
Maintenance Access
Mount the receiver at a height and location where one person can access it without specialist equipment — a ladder is acceptable, but a cherry picker or scaffolding requirement for routine maintenance is not. Receivers mounted in inaccessible positions on the crane structure accumulate avoidable additional time and cost on every service visit over the system’s operational life.
Environmental Clearance
Position the receiver at least 30 cm away from oil vapour, corrosive chemical sources, and sustained heat sources. Oil vapour contamination is a particular risk in metalworking and die-casting environments — even IP65-rated receivers will degrade if their ventilation or pressure equalization membrane is continuously exposed to oil mist. Furthermore, sustained heat above the receiver’s rated operating temperature degrades capacitors and accelerates insulation breakdown.
Antenna Clearance and Orientation
The receiver antenna must be mounted vertically with at least 15 cm clearance from any metal surface. Large metal bridge beams and crane structural members can attenuate 433 MHz signals by up to 40% when the antenna is mounted directly against or parallel to them. As a result, the antenna should face the operator’s working area — not point towards a structural member.
Step 4: Cable Routing, Connections and Grounding
Cable connections are the fundamental safety element of any crane remote control installation — wired or wireless. However, a system that appears to function correctly can still have dangerous wiring conditions that only become apparent during a fault event. Grounding and insulation must both be verified with instruments before the system is energised, not assumed from visual inspection alone.
Cable Routing Separation
Power cables, control signal cables, and protective earth conductors must be routed through separate conduits or cable trays. Specifically, routing power and control cables in the same conduit allows inductive coupling — the changing magnetic field from the power cable induces a noise voltage in the control cable that can corrupt the receiver’s input signals. This induced noise appears as random or unreliable crane responses that are misdiagnosed as interference from external sources.
Insulation Resistance Testing
Before the system is energised, measure the insulation resistance of all cables with a 500V DC insulation tester. The minimum acceptable insulation resistance is 1 MΩ under this test voltage. Cables measuring below 1 MΩ must be replaced before installation proceeds — a degraded cable insulation that passes visual inspection may still present an electric shock hazard under operating voltage conditions.
Protective Earth (Grounding) Requirements
Per IEC 60204-32, the crane structure’s protective earth resistance must be below 1 Ω measured from the crane body to the facility earth bus. The protective earth conductor must be yellow-green insulated, with a minimum cross-section of 6 mm² — not sized to match the control circuit cables, but sized to carry the prospective fault current safely. Measure and record the earth resistance value before energising. If the measured resistance exceeds 1 Ω, investigate the earth path integrity before proceeding.
Step 5: Emergency Stop and Safety Feature Testing
Emergency stop testing is not the last step of installation — it is an integral part of the installation process itself. The E-stop circuit must be verified as independently functional before any load is attached to the crane. In a fault scenario, this circuit is the only mechanism guaranteed to arrest crane motion regardless of the state of any other system component. Consequently, an unverified E-stop is a safety risk from the moment the crane is first loaded.
Emergency Stop Response Time
When the E-stop button is activated, all crane functions must arrest within 0.3 seconds or the time specified in the manufacturer’s technical documentation — whichever is shorter. Measure this with a stopwatch or — more accurately — with an oscilloscope across the contactor coil voltage. If the response time exceeds specification, inspect the receiver card’s E-stop relay output and the contactor circuit for the source of the delay.
Signal Loss Fail-Safe Test
For wireless systems, verify the fail-safe response by deliberately interrupting the transmitter signal while the crane is in motion — remove the transmitter battery or move out of range — and confirm the crane arrests automatically. This test confirms the watchdog protocol is correctly implemented and that the system does not simply stop receiving commands while continuing to execute the last one. Furthermore, confirm the system does not resume motion automatically when signal is restored — a restart must require deliberate operator action.
Key Lock and Access Control Testing
If the system includes a key lock or coded start function, test both engagement and disengagement under all operating conditions. Specifically, confirm that the lock cannot be bypassed by any input sequence other than the authorised unlock procedure. A key lock that can be bypassed provides no actual access control, and this becomes a compliance issue during regulatory inspection.
Step 6: Frequency Pairing and Channel Configuration
Wireless crane remote controls typically ship from the factory as pre-paired transmitter-receiver sets. However, if the receiver has been replaced, the system is being installed on a site with other active wireless crane systems, or the transmitter and receiver are from separate stock deliveries, pairing must be performed as part of the installation — not assumed to be complete.
Frequency Band Selection
For new installations, 868 MHz is the preferable band for industrial environments in European markets — it is less congested than 433 MHz and provides better range performance in electromagnetically complex sites. Furthermore, 868 MHz has less harmonic overlap with common VFD switching frequencies than 433 MHz. However, confirm that the 868 MHz band is the correct choice for the specific country of installation, as frequency allocations vary by jurisdiction.
Pairing Procedure and Channel Conflict Testing
Complete the manufacturer’s pairing procedure with all other crane systems on the site in a known safe state — ideally powered down during the pairing sequence. After pairing, test the channel assignment by operating all other crane remote systems on the site simultaneously and confirming that each crane responds only to its own transmitter and that no cross-activation occurs. For sites with FHSS-equipped systems, confirm FHSS is enabled and operating — a system that reverts to fixed-frequency operation after a firmware reset requires FHSS to be re-enabled before deployment.
Step 7: Final Testing and Load Commissioning
After all previous steps are confirmed complete, the system is ready for functional testing. However, the sequence matters: no-load testing first, partial load second, full load third. Proceeding directly to full load testing without the no-load verification phase risks amplifying an undetected fault into a mechanical damage event.
No-Load Function Test
Test every crane motion independently — hoist up, hoist down, bridge travel forward and back, trolley travel left and right, and any auxiliary functions. Confirm each command produces the correct direction of crane movement. Check that command response time does not exceed 0.5 seconds. Specifically, verify that releasing a command button results in immediate crane arrest — a crane that continues to creep after button release indicates either a joystick neutral position calibration issue or a contactor that is not fully dropping out.
Speed Ramp Calibration
For dual-speed and proportional (joystick) systems, verify that the slow speed setting delivers 30–50% of nominal speed. If the first speed step delivers less than 30% of nominal, load positioning accuracy is inadequate. If it delivers more than 50%, the distinction between slow and fast modes is insufficient for precision work. Adjust the speed ramp parameters in the receiver configuration to bring the ratio within this range before load testing begins.
Load Commissioning Sequence
After the no-load test is complete and all functions confirmed correct, conduct a loaded test at 50% of the crane’s rated capacity — running all motion axes through their full travel range. Confirm no unexpected response delays, contactor chattering, or mechanical noise during this test. Only after the 50% load test passes without issue should the full rated capacity test be performed. Furthermore, document both test results — a load test record is required for commissioning acceptance and is the baseline against which future performance degradation can be measured.
Commissioning Checklist: Verification Points and Standards
The table below summarises the key verification points, the acceptance criterion for each, and the applicable standard where relevant. All items must pass before the system is accepted into service.
| Verification Item | Acceptance Criterion | Standard |
|---|---|---|
| IP rating match | Minimum IP65 for dusty or wet environments | IEC 60529 |
| Supply voltage match | Receiver supply ±10% of rated voltage | IEC 60204-32 |
| Cable insulation resistance | Minimum 1 MΩ at 500V DC | IEC 60204-32 |
| Earth resistance | Crane body to earth bus < 1 Ω | IEC 60204-32 |
| Frequency pairing | Transmitter and receiver paired, no cross-activation | Manufacturer procedure |
| E-stop response time | ≤ 0.3 seconds (or manufacturer spec) | EN ISO 13850 |
| Command response time | ≤ 0.5 seconds at maximum operating distance | Manufacturer specification |
| Signal loss fail-safe | Crane arrests automatically on signal loss | ISO 13849-1 PL-d |
Conclusion: Every Skipped Step Becomes a Future Fault
Installation errors in crane remote control systems do not always produce immediate failures. In many cases, the fault develops slowly — grounding resistance increases incrementally, cable insulation degrades progressively, parazit accumulates as the electromagnetic environment changes. The system appears functional for weeks or months, then fails in a way that is difficult to trace back to the original installation decision. Following the seven steps and verification checklist in this guide produces a system that is correctly installed from the start — and provides the measurement baseline needed to identify deterioration before it becomes a failure. For professional installation and commissioning services, see our crane remote control installation service.
Frequently Asked Questions
Can I install a crane remote control system myself?
Mechanical mounting of the receiver enclosure and routing of the transmitter can be performed without specialist training. However, the electrical connections to the crane’s contactor circuit, the protective earth wiring, the insulation resistance measurements, and the E-stop circuit integration require a qualified electrician and an authorised service technician. Incorrect wiring at any of these stages voids the CE certification of the installed system and creates regulatory liability. For professional installation, see our installation service.
How long does crane remote control installation typically take?
A standard wireless crane remote control installation on a well-maintained crane with accessible wiring typically takes between 4 and 8 hours — including electrical connection, pairing, no-load testing, and load commissioning. However, installations on cranes with outdated wiring, missing earth connections, or existing interference problems take significantly longer. Specifically, a crane with grounding resistance above 1 Ω requires earth path investigation before any other installation work proceeds.
Which frequency band is safer — 433 MHz or 868 MHz?
Both bands are safe when the system is correctly installed. However, 868 MHz is preferable for industrial environments with dense wireless traffic or significant VFD EMI — it is less congested and has less harmonic overlap with common industrial interference sources. Consequently, for new installations on sites with multiple wireless devices or welding equipment, specify 868 MHz. For simple installations with a single crane on a clean RF site, 433 MHz is adequate.
How often should crane remote control maintenance be performed after installation?
The minimum maintenance schedule is: battery and E-stop function check every shift; visual inspection and button cleaning weekly; antenna orientation and receiver connection check every 3 months; grounding resistance measurement every 6 months; and full safety relay function test, insulation resistance measurement, and firmware review annually by the authorised service team. The annual test is particularly important — it re-establishes the measured baseline against which the subsequent year’s condition is compared.
Can transmitters and receivers from different brands be used together?
No. Transmitter and receiver must be a matched pair from the same manufacturer and compatible model series. The communication protocol, pairing sequence, safety relay implementation, and watchdog timing are all brand-specific and are not interoperable between manufacturers. Using a transmitter from one brand with a receiver from another creates an uncertified system, voids both products’ CE certification, and produces unpredictable crane behaviour that cannot be verified against any safety standard.
What should I do if the crane continues to move slowly after the command button is released?
Continued crane movement after button release indicates either a joystick neutral position calibration fault (in proportional systems) or a contactor that is not fully dropping out after the relay contact opens. Take the crane out of service immediately — a crane that does not arrest on command release cannot be operated safely with a load. For joystick systems, recalibrate the neutral position setting in the receiver parameters. For contactor issues, inspect the coil circuit and contact mechanism.
Does replacing a receiver require a new pairing procedure?
Yes, always. A new receiver has no knowledge of the previous transmitter’s pairing code — it must be paired from the beginning using the manufacturer’s pairing procedure. Additionally, all safety-relevant connections — particularly the E-stop NC contact wiring — must be re-verified to the new receiver. A receiver that is electrically connected but not correctly paired may respond to other transmitters on the same site rather than its own, creating a serious cross-activation safety risk.
Contact Vinç Kumanda Servisi
Need professional crane remote control installation, commissioning, or post-installation inspection? Contact Vinç Kumanda Servisi via WhatsApp at +90 532 546 84 62, email us at info@vinckumandaservisi.com, or visit our contact page for a tailored quote.